Wednesday, July 23, 2014

Docker in a development enviroment

Intro


A few days ago I wrote a tutorial on how to setup docker and use it between different machines. Now that was a nice first insight on how to jump-start using docker. It was also a nice way to showcase the possibilities and limitations of Docker.

In this post I will give some practical information on how to use docker as a developer.

Setup


To use Docker for development of software we want mainly three things:

  • Have our source code on the host machine. That way we can use GUI editors and whatever tools we want from outside the container.

  • Be able to have multiple terminals to the same container. This is good for debugging

  • Setup a docker image which we will use for running our program. I will use Django and Python for that.


And for the visual brains out there:
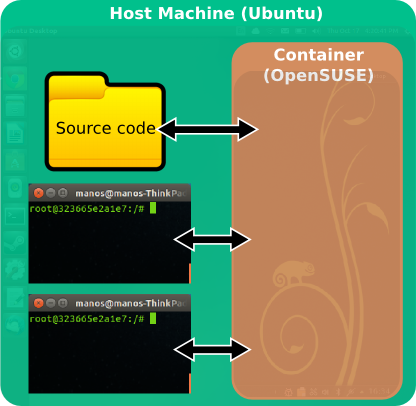
container_host_communication
As you see in the pic, I am using Ubuntu as my host machine. At the same machine I have a folder with the source code and two terminals. Then I run a container with OpenSUSE. The folder and terminals reside ont he host machine but they communicate directly with the container. I will describe below how to achieve all this.

Multiple terminals


The easiest way to have multiple terminas is to use a small tool called nsenter. The guide can be found at https://github.com/jpetazzo/nsenter but it sums up to running this one-liner from any folder:

[code]
> docker run --rm -v /usr/local/bin:/target jpetazzo/nsenter
[/code]

That installs nsenter on the host machine. After that, we can use it directly. So let's try it. Open bash in a container with ubuntu as our basic image:

[code]
> docker run -t -i ubuntu /bin/bash
root@04fe75de21d4:/# touch TESTFILE
root@04fe75de21d4:/# ls
TESTFILE boot etc lib media opt root sbin sys usr
bin dev home lib64 mnt proc run srv tmp var
[/code]

In the terminal above, I created a file called TESTFILE. We will try to open a second terminal and check to see the file from it.

To use xsenter we need the process ID of the container. Unfortunately we can't use ps aux but rather have to use docker's inspect command. I open a new terminal and type the below
[code]
> PID=$(docker inspect --format {{.State.Pid}} 04fe75de21d4)
> sudo nsenter --target $PID --mount --uts --ipc --net --pid
[/code]

The string 04fe75de21d4 I gave is the ID of my container. If everything went ok, your terminal prompt will change to the same ID:
[code]
root@04fe75de21d4:/# ls
TESTFILE bin boot dev etc home lib lib64 media mnt opt proc root run sbin srv sys tmp usr var
[/code]

See the TESTFILE there? Congrats! Now we have a second terminal to the exact same container!


Share a folder between host and container


Now I want to have a folder on my host computer and be able and access it through a container.

Luckily for us there is a built-in way to do that. We just have to specify a flag -v to docker. First let's make a folder though that will be mounted:

[code]
> mkdir /home/manos/myproject
[/code]

Let's now mount it into the container:
[code]
> sudo docker run -i -t -v /home/manos/myproject:/home/myproject ubuntu /bin/bash
> root@7fe33a71ac2f:/#
[/code]

If I now create a file inside /home/manos/myproject the change will be reflected from inside the container and vice versa. Play a bit with it by creating and deleting files from either the host or from inside the container to see for yourself.


Create a user in the container


It is wise to have a normal user in your image. If you don't then you should create one and save the image. That way the source files can be opened from a normal user on your host - you won't need to launch your IDE with root privileges.

[code]
> adduser manos
..
[/code]

Follow the instructions and then commit your image. That way whenever you load the image again, you will be having user manos. To change to user manos just type

[code]
> su manos
[/code]

All files you create now, will be accesible by a normal user at the host machine. Something else you could do is to somehow


Real life scenario: Python, Django and virtualenv


I wanted to learn Django. Installing Django is commonly made with the package manager pip, but pip has a bad history of breaking up things since it doesn't communicate with Debian's apt. So at some point if you installed/uninstalled python stuff with apt, pip wouldn't know about it and vice versa. In the end you would end up with a broken python environment. That's why a tool called virtualenv is being used - a tool that provides isolation. Since we have docker though which also provides isolation we can simply use that.

So what I really want:

  1. Have the source code on my host.

  2. Run django and python inside a container.

  3. Debug from at least two terminals.


Visually my setup looks as something like this:
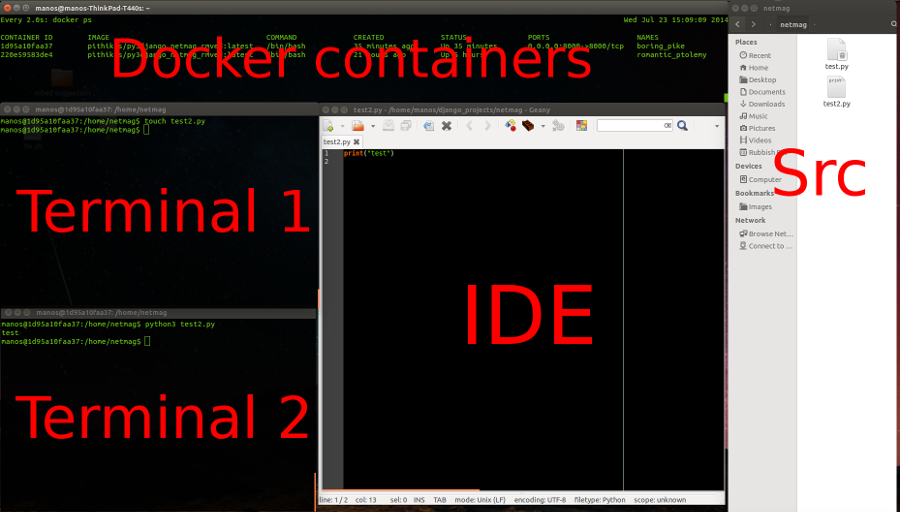
docker_dev_setup_labels_900x500

I assume you have an image with django and python installed. Let's call the image py3django.

Firstly create the folder where you want your project source code to be. This is the folder that we will mount. My project resides in /home/manos/django_projects/myblog for example.

Once it's created I just run bash on the image py3django. This will be my primary terminal (terminal 1):

[code]
> sudo docker run -i -t -p 8000:8000 -v /home/manos/django_projects/myblog:/home/myblog py3django /bin/bash
root@2fe3611c1ec2:/home#
[/code]

The flag -p makes sure that docker doesn't choose a random port for us. Since we run Django we will want to run a web server with a fixed port (on 8000). The flag -v mounts our host folder /home/manos/django_projects/myblog to the container's folder /home/myblog. py3django is the image I have.

Now we have a folder where we can put our source code and a working terminal to play with. I want though a second terminal (terminal 2) to run my python webserver. So I open a second terminal and type:

[code]
> sudo nsenter --target $(docker inspect --format {{.State.Pid}} 2fe3611c1ec2) --mount --uts --ipc --net --pid
> root@2fe3611c1ec2:/#
[/code]

Mind that I had to put the appropriate container ID in the command above.

Now all this is very nice but admittedly it's very complex and it will be impossible to remember all these commands and boring to type them each single day. Therefore I suggest you create a BASH script that initiates the whole thing.

For me it took a whole day to come up with the script below:
[code language="bash"]
#! /bin/bash

django_project_path="/home/manos/django_projects/netmag" # Path to project on host
image="pithikos/py3django_netmag_rmved" # Image to run containers on

echo "-------------------------------------------------"
echo "Project: $django_project_path"
echo "Image : $image"


# 1. Start the container in a second terminal
proj_name=`basename $django_project_path`
old_container=`docker ps -n=1 -q`
export docker_line="docker run -i -t -p 8000:8000 -v $django_project_path:/home/$proj_name $image /bin/bash"
export return_code_file="$proj_name"_temp
rm -f "$return_code_file"
gnome-terminal -x bash -c '$docker_line; echo $? > $return_code_file'
sleep 1
if [ -f "$return_code_file" ] && [ 0 != "$(cat $return_code_file)" ]
then
echo
echo "--> ERROR: Could not load new container."
echo " Stop any other instances of this container"
echo " if they are running and try again."
echo
echo " To reproduce the error, run the below:"
echo " $docker_line"
echo
rm -f "$return_code_file"
exit 1
fi
rm -f "$return_code_file"


# 2. Connect to the new container
while [ "$old_container" == "`docker ps -n=1 -q`" ]; do
sleep 0.2
done
container_ID=`docker ps -n=1 -q`
sudo nsenter --target $(docker inspect --format {{.State.Pid}} $container_ID) --mount --uts --ipc --net --pid
[/code]

This script starts a container on a second terminal and then connects to the container from the current terminal. If starting the container fails, an appropriate message is given. django_project_path is the full path to the folder on the host with the source code. The variable image holds the name of the image to be used.

You can combine this with devilspie, an other nice tool that automates the position and size of windows when they're launched.

In case you wonder about the top window with all the containers, that's simply a watch command, a tool that updates regularly a command. In my case I use watch with docker ps. Simple stuff:
[code]
> watch docker ps
[/code]

I use this because I personally like having an overview on the running containers. That way I don't end up with trillions of forgotten containers that eat up my system.

Now that you have everything setup you can also run django server from one of the two terminals or whatever else you might want.

Monday, July 21, 2014

Docker tutorial

So as an intern in a big company I was given the task to get comfortable with docker. The problem is that docker is quite fresh so there isn't really that much of good tutorials out there. After reading a bunch of articles and sparse tutorials (even taken the official tutorial at https://www.docker.com/tryit), I still straggled to get a firm grip on what docker even is supposed to be used for. Therefore I decided to make this tutorial for a total beginner like me.

Docker vs VirtualBox


There are many different explanations on the internet about what docker is and when to use it. Most of them however tend to complicate things more than giving some practical information for a total beginner.

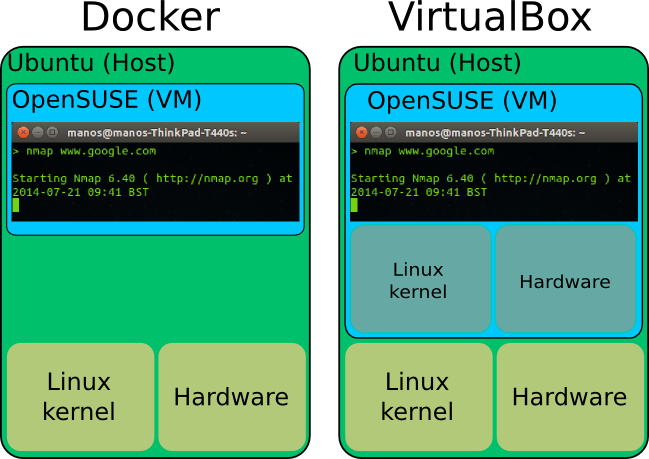
Docker simply put is a replacement for virtual machines. I will use virtual box as a comparison example since it's very easy for anyone to download and try to see the differences themselves.

The application VirtualBox is essentially a virtual machine manager.
text3806

Each and every of the OSes you see in the picture above, is an installed virtual machines. Each such machine has it's own installed OS, kernel, virtual devices like hard disks, network cards etc. All this takes a considerate amount of memory and needs extra processing power. All virtual machines (VM) like VMware, Parallels, behave the same.

text4037

Now imagine that we want to use nmap from an OpenSUSE machine but we are on an Ubuntu. Using VirtualBox we would have to install the whole OS and then run it as a virtual machine. The memory consumption is humongous for such a trivial task.

In contrast to VirtualBox or any other virtual machine, Docker doesn't install the whole OS. Instead it uses the kernel and hardware of our primary computer (the host). This makes Docker to virtualize super fast and consume only a fraction of the memory we would else need. See the benefits? Imagine if we wanted to run 4 different programs on 4 different OSes. That would take at a minimum 2GB of RAM.

But why would you want to run nmap on openSUSE instead of the host computer? Well this was just a silly example. There are other examples that prove the importance of a tool like Docker. Imagine that you're a developer and you want to test your program on 10 different distributions for example. Or maybe you are the server administrator on a company and just updated your web server but the update broke something. No problem, you can run your web server virtualized on the older system version. Or maybe you want to run a web service in a quarantine for security reasons. As you see there are loads of different uses.

One question might rise though: how do we separate each "virtual machine" from the rest of the stuff on our computer? Docker solves this with different kernel (and non-kernel) mechanisms. We don't have to bother about them though, since Docker takes hands of everything for us. That's the beauty of it afterall: simplicity.


Install docker


Docker is in the ubuntu repositories (Ubuntu 14.04 here) so it's as straightforward as:
sudo apt-get install docker


Once installed, a daemon (service) of the docker will be running. You can check that with

sudo service docker.io status

The daemon is called docker.io as you might have noticed. The client that we willuse is simply called docker. Pay attention to this tiny but significant detail.

Configuration


Do these two things before using docker to avoid any annoying warnings and problems.

Firstly we need to add ourselves to the docker group. This will let us to use docker without having to use sudo every time:
[code]sudo adduser <your username here> docker[/code]
Log out and then in.

Secondly we will edit the daemon configuration to ensure that it doesn't use any local DNS servers (like 127.0.0.1). Use your favourite editor to edit the /etc/default/docker.io file. Uncomment the line with DOCKER_OPTS. The result file looks like this for me:
[code]
# Docker Upstart and SysVinit configuration file

# Customize location of Docker binary (especially for development testing).
#DOCKER="/usr/local/bin/docker"

# Use DOCKER_OPTS to modify the daemon startup options.
DOCKER_OPTS="-dns 8.8.8.8 -dns 8.8.4.4"

# If you need Docker to use an HTTP proxy, it can also be specified here.
#export http_proxy="http://127.0.0.1:3128/"

# This is also a handy place to tweak where Docker's temporary files go.
#export TMPDIR="/mnt/bigdrive/docker-tmp"
[/code]

We need to restart the daemon for the change to take effect:
[code]sudo service docker.io restart[/code]


Get an image to start with


In our scenario we want to virtualize an Arch machine. On VirtualBox, we would download the Arch .iso file and go through the installation process. In Docker we download a "fixed" image from a central server. There are thousands of different such image files. You can even upload your own image as you will see later.

[code]> docker pull base/arch
Pulling repository base/arch
a64697d71089: Download complete
511136ea3c5a: Download complete
4bbfef585917: Download complete
[/code]

This will download a default image for Arch Linux. "base/arch" is the identifier for the Arch Linux image.

To see a list of all the images locally stored on your computer type
[code]> docker images
REPOSITORY TAG IMAGE ID CREATED VIRTUAL SIZE
base/arch 2014.04.01 a64697d71089 12 weeks ago 277.1 MB
base/arch latest a64697d71089 12 weeks ago 277.1 MB[/code]


Starting processes with docker


Once we have an image, we can start doing things in it as if it was a virtual machine. The most common thing is to run bash in it:

[code]> docker run -i -t base/arch bash
[root@8109626c57f5 /]#
[/code]

See how the command prompt changed? Now we are inside the image (virtual machine) running a bash instance. In docker jargon we are actually inside a container. The string 8109626c57f5 is the ID of the container. You don't need to know much about that now. Just pay attention to how we acquired that ID, you will need it.

Let's do some changes. Firstly I want to install nmap. Since pacman is the default package manager in Arch, I will use that:

[code][root@8109626c57f5 /]# pacman -S nmap
resolving dependencies...
looking for inter-conflicts...
..
[/code]


Let's run nmap to see if it works:
[code]
> nmap www.google.com
Starting Nmap 6.46 ( http://nmap.org ) at 2014-07-18 13:33 UTC
Nmap scan report for www.google.com (173.194.34.116)
Host is up (0.00097s latency).
..
[/code]

It seems we installed it successfully! Let's also create a file:
[code][root@8109626c57f5 /]# touch TESTFILE[/code]

So now we have installed nmap and created a file in this image. Let's exit the bash
[code][root@8109626c57f5 /]# exit
exit
>
[/code]

In VirtualBox you can save the state of the virtual machine at any time and load it later. The same is possible with docker. For this I will need the ID of the container that I was using. In our case that is 8109626c57f5 (it was written in the terminal prompt all the time). In case you don't remember the ID or you have many different containers, you can list all the containers:

[code]
> docker ps -a
CONTAINER ID IMAGE COMMAND CREATED STATUS
8109626c57f5 base/arch:2014.04.01 bash 25 minutes ago Exit 0
[/code]

Let's save the current state to a new image called mynewimage:
[code]
> docker commit -m "Installed nmap and created a file" 8109626c57f5 mynewimage
6bf56047833bd41c43c9fc3073424f37bfbc96993b65b868cb8d6a336ac28b0b
[/code]

Now we have the saved image locally on our computer. We can load it anytime we want to come back to this state. And the demonstration..
[code]
> docker run -i -t mynewimage bash
[root@55c343f1643a /]# ls
TESTFILE bin boot dev etc home lib lib64 mnt opt proc root run sbin srv sys tmp usr var
[root@55c343f1643a /]# whereis nmap
nmap: /usr/bin/nmap /usr/share/nmap /usr/share/man/man1/nmap.1.gz
[/code]


Loading the image on an other computer


We now have two images, the initial Arch image we started with and the new image that we saved:
[code]
> docker images
REPOSITORY TAG IMAGE ID CREATED VIRTUAL SIZE
mynewimage latest 6bf56047833b 2 hours ago 305.8 MB
base/arch 2014.04.01 a64697d71089 12 weeks ago 277.1 MB
base/arch latest a64697d71089 12 weeks ago 277.1 MB
[/code]

It's time to load the new image on a totally different computer. First I need to save the image on a server though. Luckily for a docker user, this is very simple. First you need to make an account at https://hub.docker.com/

Once that is done we need to upload the image to the hub. However we have to save the image in a specific format, namely username/whatever.

[code]
Let's save the image following that rule:
> docker commit -m "Installed nmap and created a file" 8109626c57f5 pithikos/mynewimage
12079e0719ce517ec7687b4bf225381b99b880510cda3bc1e587ba1da067bd3b
[/code]

First we need to login to the server:
[code]> docker login
Username (pithikos):
Login Succeeded[/code]

Then I upload the image to the server:
[code]> docker push pithikos/mynewimage
The push refers to a repository [pithikos/mynewimage] (len: 1)
Sending image list
..
[/code]

Once everything is uploaded, we can pull it from anywhere just as we did when we first pulled the Arch image.

I will do that from inside an OpenSUSE install on a totally different machine. First I try to run nmap

Screenshot from 2014-07-18 17:17:05

As you see it's not installed on the computer. Let's load our Arch image that we installed nmap on
Screenshot from 2014-07-18 17:22:34

Once the download of the image is complete we will run a bash on it just to look around:

Screenshot from 2014-07-18 17:27:19_

As you see, the TESTFILE is in there and we can run nmap. We are running the same Arch I ran earlier on Ubuntu, on a totally new machine with a totally different OS, but still running it as an Arch.


A bit on containers


Now you probably got a good idea on what images are. Images are simply states of a "virtual machine".

When we use docker run whatever we are running is put inside a container. A container is pretty much a Linux concept that arose recently with the recent addition of Linux containers to the kernel. In practise container is running a process (or group of processes) in isolation from the rest of the system. This makes the process in the container to not being able to have access to other processes or devices.

Every time we run a process with Docker, we are creating a new container.

[code]> docker run ubuntu ping www.google.com
PING www.google.com (64.15.115.20) 56(84) bytes of data.
64 bytes from cache.google.com (64.15.115.20): icmp_seq=1 ttl=49 time=11.4 ms
64 bytes from cache.google.com (64.15.115.20): icmp_seq=2 ttl=49 time=11.3 ms
^C
> docker run ubuntu ping www.yahoo.com
PING ds-any-fp3-real.wa1.b.yahoo.com (46.228.47.114) 56(84) bytes of data.
64 bytes from ir2.fp.vip.ir2.yahoo.com (46.228.47.114): icmp_seq=1 ttl=45 time=46.5 ms
64 bytes from ir2.fp.vip.ir2.yahoo.com (46.228.47.114): icmp_seq=2 ttl=45 time=46.1 ms
^C
[/code]

Here I ran two instances of the ping command. First I pinged www.google.com and then www.yahoo.com. I had to stop them both with CTRL-Z to get back to the terminal.

[code]
> docker ps -a | head
CONTAINER ID IMAGE COMMAND CREATED STATUS
7c44887b2b1c ubuntu:14.04 ping www.yahoo.com About a minute ago Exit 0
72d1ca1b42c9 ubuntu:14.04 ping www.google.com 7 minutes ago Exit 0
[/code]

As you see, each command got its own container ID. We can further analyse the two containers with the inspect command. Below I compare the two different ping commands I ran to make it more apparent how the differentiate in the two containers:

[code]
> docker inspect 7c4 > yahoo
> docker inspect 72d > google
> diff yahoo google
2,3c2,3
< "ID": "7c44887b2b1c9f0f7c10ef5e23e2643026c99029fce8f1575816a23e56e0c2d0",
< "Created": "2014-07-21T10:05:45.106057381Z",
---
> "ID": "72d1ca1b42c995973086a5fb3c5e256d5cb2c5055e8f9040037bb6bb915c8187",
> "Created": "2014-07-21T10:00:08.653219667Z",
6c6
< "www.yahoo.com"
---
> "www.google.com"
9c9
< "Hostname": "7c44887b2b1c",
---
> "Hostname": "72d1ca1b42c9",
29c29
< "www.yahoo.com"
---
> "www.google.com"
44,45c44,45
..
[/code]

Notice that I don't have to write the whole string. For example instead of 7c44887b2b1c, I just type the first three letters 7c4. In most cases this will suffice.